


You notice it first in the rooms that never feel right. One bedroom stays stuffy, the hallway gets chilly, and the air conditioner seems to run forever while the house still feels uneven. That's usually the point where ductwork deserves attention, because leaky or poorly insulated ducts can waste conditioned air before it ever reaches the register, and the fix is often more about air sealing and proper wrap installation than buying a bigger system.
For homeowners comparing quality air conditioning repairs, AC installation, and AC maintenance, duct insulation is one of those jobs that can improve comfort without changing the equipment itself. It matters for heat pumps, furnaces, and duct design because the air handler can only do its job if the ducts carry that air efficiently. If you've already wondered why your bill feels too high, the issue may be hiding in the attic or crawlspace, not at the thermostat, and a good starting point is a look at why your energy bill feels out of control.
Why Insulating Your Ductwork Is a Smart Home Upgrade
High bills and uneven temperatures usually show up together. You pay to condition the air, then duct losses let that air warm up, cool down, or leak away before it reaches the rooms that need it. In hot Arizona spaces, especially attics and garages, that loss shows up fast because the duct surface is sitting in a harsh environment instead of a conditioned one.
Insulating ductwork helps more than comfort. It supports temperature delivery, reduces stress on the HVAC system, and works best when the ducts are sealed first so the wrap isn't trying to compensate for leaks. The practical benefit is simple, the system stops fighting itself as much, which is exactly what you want from AC maintenance and long-term performance.
Practical rule: Seal the duct first, insulate second. If air is escaping through joints or seams, thicker wrap won't solve the real problem.
That's why this job fits so well into broader quality air conditioning repairs and AC installation work. When ducts are insulated correctly, the equipment doesn't have to battle avoidable heat gain or heat loss on every cycle. The result is steadier airflow, less waste in unconditioned spaces, and a system that feels more balanced from room to room.
It also matters for indoor air quality in a practical sense. Sealed seams and continuous insulation reduce the chance that hot, dirty attic air gets pulled into the system through gaps. That's not a replacement for filtration or cleaning, but it does remove one more weak point in the duct path.
Choosing the Right Duct Insulation Materials and Tools
The right material depends on where the duct runs, how much room you have, and whether the duct sits in a hot attic, a garage, a crawlspace, or a more protected indoor area. A widely used rule of thumb for residential duct insulation is R-5 minimum, with higher R-values recommended in colder climates, and the technical point that matters most is simple, the insulation has to be chosen for the duct's location and regional climate. The U.S. DOE Building America measure guideline also ties performance to sealing ducts first, then wrapping them without compression so the insulation can do its job U.S. DOE Building America measure guideline.
Here's a practical comparison of the common material choices homeowners run into.
| Material Type | Typical R-Value (per inch) | Best For | Notes |
|---|---|---|---|
| Fiberglass duct wrap | Varies by product | Most residential duct runs in unconditioned spaces | Common, flexible, and widely used. Needs careful sealing so it isn't compressed or left with gaps. |
| Rigid foam board | Varies by product | Specific boxy duct sections or framed enclosures | Useful where flat surfaces and clean cuts are easier to manage. Not the first choice for wrapped bends. |
| Reflective insulation | Varies by product | Some attic or radiant-heat applications | Works best when installed correctly and paired with good air sealing. It's not a shortcut around leaks. |
For straight runs in attics or crawlspaces, fiberglass wrap is usually the most familiar choice. For exposed indoor ductwork, the University of Michigan engineering design guide points to rigid board fiberglass with a paintable jacket in exposed areas, while outdoor ductwork calls for high-density foam plastic or rigid fiberglass with mastic sealing and a weather-resistant painted finish University of Michigan design guide. That location-based approach matters because the duct's environment changes the material choice.
You'll also want the right tools before you start. Bring a utility knife with fresh blades, a tape measure, straightedge, mastic, UL 181-rated foil tape, gloves, eye protection, and a dust mask. A stapler or fastening method may be needed depending on the product, and a small brush or putty knife helps spread mastic cleanly around seams and fittings.
Good workmanship starts on the bench, not on the ladder. Measure, cut, and stage your pieces before you wrap the first section. That keeps the insulation tight and reduces sloppy overlaps.
If you're insulating ducts in a hot attic, don't chase the highest R-number blindly. Fit, continuity, and proper sealing matter more than overspecifying material that won't fit cleanly around fittings, elbows, and support points. A wrap that goes on smoothly and stays uncompressed will outperform a thicker one that gets crushed or left open at the seams.
Preparation Is Key Sealing Duct Leaks Before You Insulate
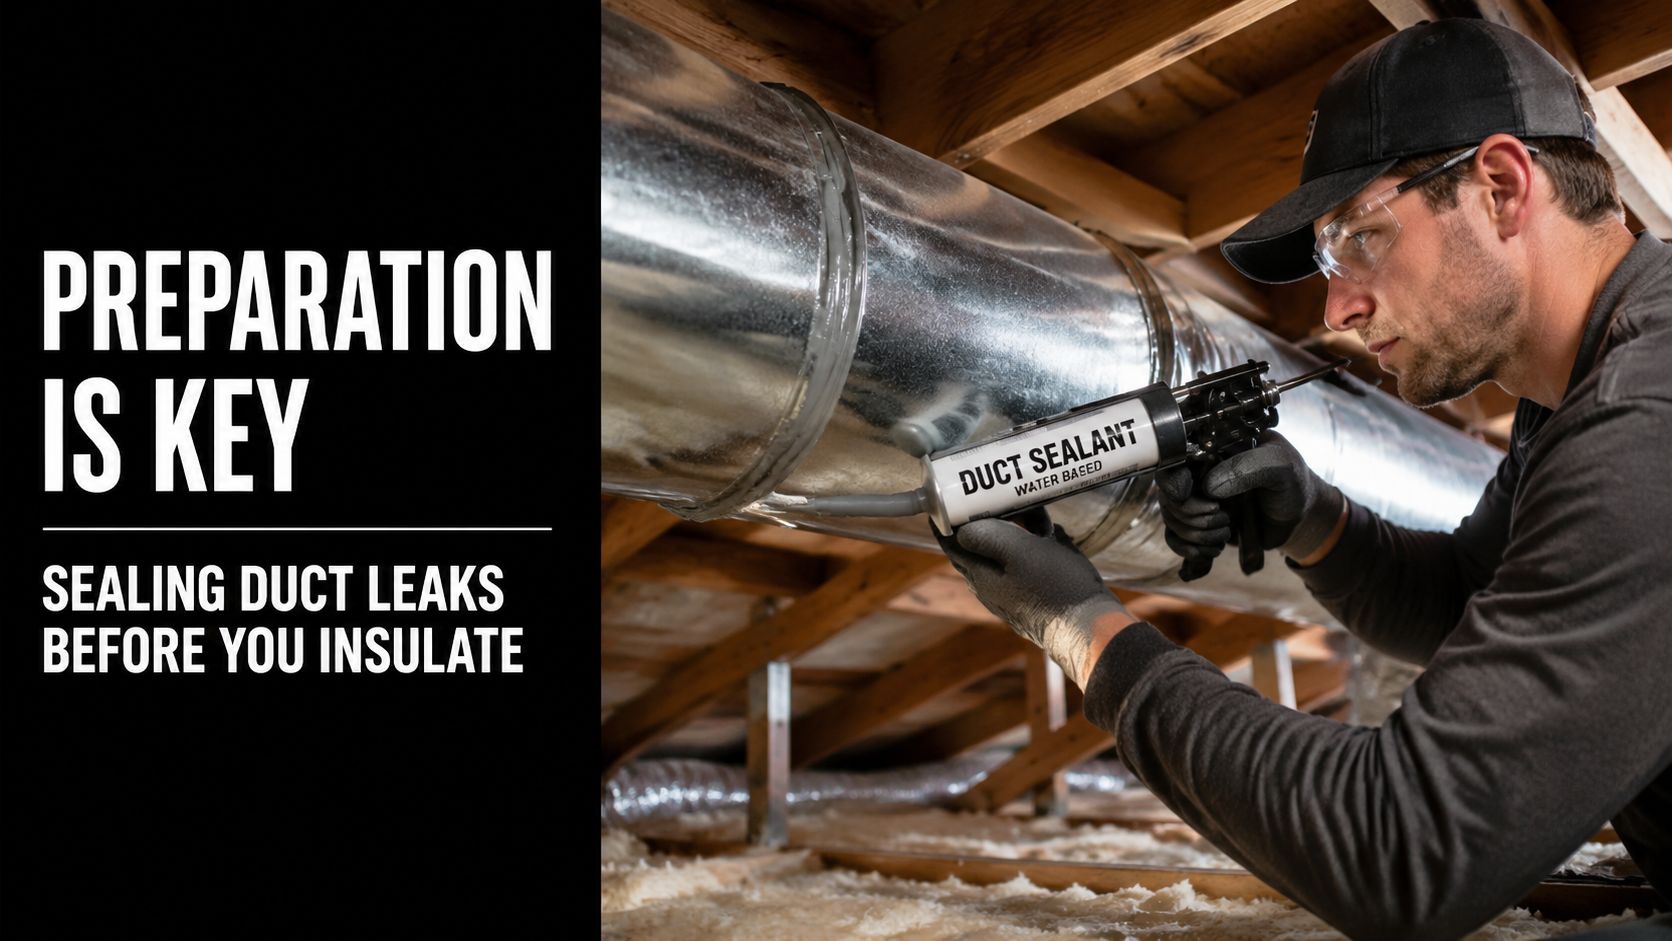
Insulating a leaky duct is a waste of effort. If the air is escaping through joints, elbows, or terminations, the wrap can't protect the system the way it should, and any gap can turn into a thermal bridge or a moisture problem later. That's why the first pass is always inspection, not wrapping.
Start by running your hand near seams, joints, takeoffs, and connections where the duct meets boots or transitions. Feel for air movement, look for separated seams, and check every hanger penetration, because those are common leak points and the places that get ignored when people move too fast. The DIY guide from Gupta Pipe Insulation recommends rechecking every seam and treating hanger penetrations and corners with extra care, which matches field reality in attics and crawlspaces Gupta Pipe Insulation guide.
Unsealed transitions are where clean installs go bad. If the elbow or joint isn't tight before the wrap goes on, the wrap only hides the mistake.
Use mastic or UL 181-rated foil tape on the actual duct seams and joints. The Building America guideline and step-by-step homeowner guides both place sealing first, because the insulation works properly only after the duct envelope is closed U.S. DOE Building America measure guideline. A homeowner's version of that workflow is straightforward, clean the surface, seal the leaks, and let the sealant set before you add insulation.
If you want a deeper walk-through of sealing methods, this guide on how to seal ductwork is the right place to compare materials and spot the mistakes that show up in unfinished attics. The main thing to remember is that duct tape by itself is not the answer, because it doesn't belong in the same category as mastic or approved foil tape for long-term HVAC sealing.
After sealing, inspect again. Look for missed corners, loose edges, and any point where the duct changes shape. If the metal still feels drafty or you can see daylight through a joint, stop there and fix it before you touch the insulation roll.
The Duct Insulation Installation Process
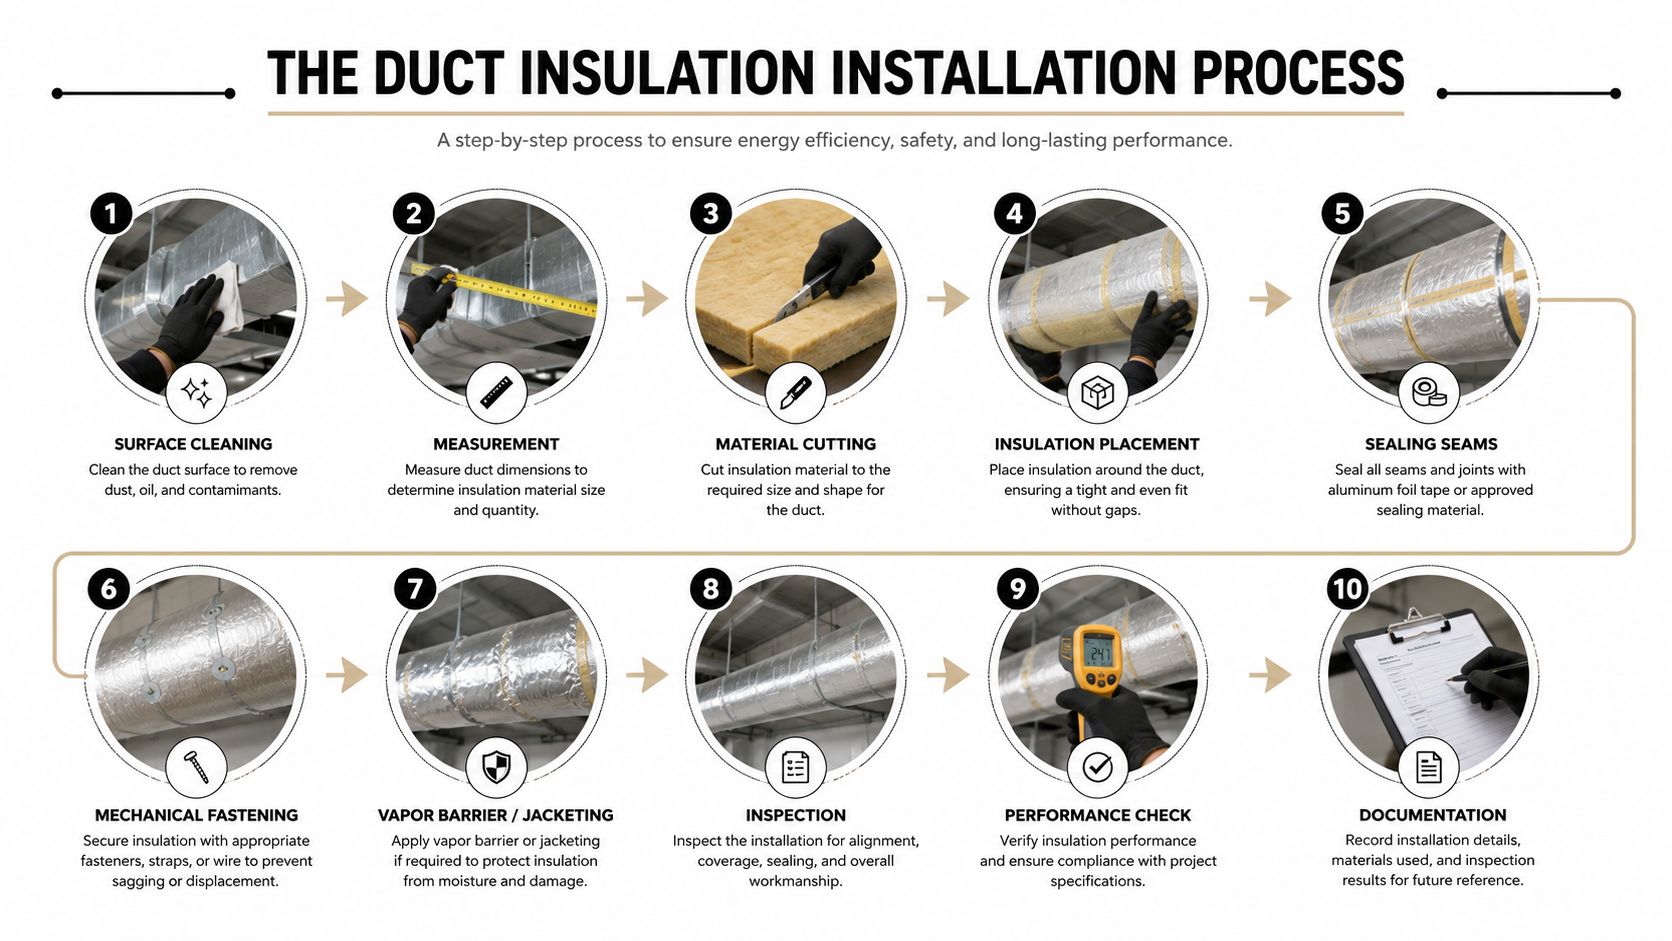
The wrapping job gets easier once the duct is sealed and clean. Measure the duct perimeter carefully, then cut the insulation so it covers the full surface without compression. That detail matters, because compressed fiberglass loses performance, and the DOE guidance for existing homes says the wrap should be cut to size, trimmed by about 2 inches at overlapping sections, then stapled and taped so the finished layer creates a continuous air barrier U.S. DOE Building America measure guideline.
Step by step wrap that actually holds up
Lay the insulation flat first and mark your cuts with a straightedge. A clean cut matters more than a fast one, because ragged edges make sealing harder and create gaps at the seam.
Wrap the material around the duct snugly, not tightly. The goal is contact, not compression, and the facing should meet cleanly along the longitudinal seam without bulging or stretching. For long runs, some field guides recommend securing the wrap at regular intervals and rechecking the entire duct for exposed areas or loose seams, which is a good habit when you're working overhead in a hot attic Gupta Pipe Insulation guide.
Seal the seam with foil tape and reinforce the end laps. The This Old House duct-insulation guidance places the sealing sequence clearly, joints first, then wrap, then sealed seams and end laps, because gaps at the finish line can undo the entire job This Old House ductwork guide. If the insulation has a facing, that facing needs to stay continuous and intact so it can perform as an air or vapor retarder.
Practical rule: If you have to force the wrap to close, it's too small or the duct shape needs a different cut. Forcing it usually creates a worse seal later.
What a good finished run looks like
A correct installation looks clean, even at the edges. The seams are taped, the wrap stays fluffy instead of crushed, and every termination is sealed without open corners or loose folds. If you can see exposed metal, find the reason and correct it before you move on.
This is also where workmanship matters for AC maintenance and future service. A neat wrap is easier to inspect later, and a sealed jacket helps reduce the chance that moisture sneaks into the insulation layer. That's the kind of detail that keeps a duct system easier to service and more consistent over time.
Handling Tricky Spots and Common Installation Mistakes
The straight runs are the easy part. Elbows, T-joints, size transitions, hanger points, and short offsets are where DIY jobs usually lose their seal, because the material wants to bridge instead of follow the shape. That's why fitting work deserves as much attention as the long, obvious duct sections.
Use short pieces where the geometry changes
At elbows, make relief cuts or small slits so the wrap can bend without bunching up. Short tape sections or mastic help lock those areas in place, and the key is to avoid creating a bridge that leaves a hollow behind the insulation. Instructional sources that focus on bends and fittings emphasize that elbows use more material and need careful cutting to avoid compression and leaks, which is why these spots take more time than beginners expect YouTube instructional source.
For T-joints and transitions, treat each branch separately. Wrap the main run first, then fit the branch pieces so the seams overlap cleanly rather than meeting at a point. If two pieces meet in a complex spot, use shorter foil-tape strips to follow the shape, then inspect the edges for lifted corners.
Don't ignore supports and penetrations
Hanger straps and support points can punch through the jacket or leave tiny openings around the penetration. The practical fix is to tape or mastic around each hanger area, then recheck the seam after the duct is fully wrapped. That habit is especially important in attics, where movement, heat, and time can loosen a rushed installation Gupta Pipe Insulation guide.
A few mistakes show up again and again:
- Wrapping too tightly: Compression lowers insulation performance and can distort the duct shape.
- Leaving seam gaps: Open seams break the air barrier and invite condensation.
- Using the wrong tape: Not every tape is suitable for HVAC sealing, so the foil tape or mastic has to be the approved material.
- Skipping fittings: Elbows, transitions, and terminations need full coverage, not just the straight run.

A university design standard from Florida Tech gets very specific on workmanship, including stapled seams on maximum 6-inch centers, mechanical fasteners and speed clips on ducts 24 inches wide or greater at maximum 18-inch centers, and repair of damaged facing with vapor-barrier tape and mastic Florida Tech ductwork insulation standard. That kind of detail sounds fussy until you've seen a seam open up after a season of attic heat.
The best field habit is to do a slow walk-through at the end. Check every corner, every transition, every place the duct passes a support, and every spot where tape overlaps. If the job looks perfect from 10 feet away but has open edges up close, it's not finished.
Know Your Limits When to Call Cobre Valley Air
Some duct insulation jobs are straightforward, and some are really duct-system problems wearing insulation as a disguise. If you find crushed sections, disconnected runs, visible mold, wet insulation, or a layout that never seemed to deliver air evenly in the first place, that's bigger than a wrap-and-tape project. A proper inspection can tell you whether the system needs repair, redesign, or replacement before insulation makes sense.
That distinction matters for heat pumps, furnaces, and duct design. The University of Michigan guide makes it clear that insulation choice changes with duct type and location, and some duct types, like exhaust duct, shouldn't be insulated in that guidance at all University of Michigan design guide. If the system is poorly routed, overloaded, or damaged, the right answer may be airflow correction rather than more insulation.
For homeowners who want to compare the cost of a professional look-over, the right place to start is this page on ductwork inspection cost. That kind of evaluation becomes even more valuable when the ducts run through unconditioned spaces, where leakage, support issues, and moisture risks all stack up together.
If the ductwork is damaged, contaminated, or badly designed, insulation won't rescue it. Fix the system first.
That's where a local HVAC team earns its keep. A good contractor can evaluate the ducts, spot hidden losses, and decide whether you need sealing, repair, redesign, or a full installation update. For homeowners in Globe, Miami, and Superior, that's often the difference between a cosmetic improvement and a real performance fix.
If you want ductwork inspected, sealed, insulated, or repaired the right way, Cobre Valley Air LLC can help you sort out the problem before it gets more expensive. Visit Cobre Valley Air LLC to schedule service and get straightforward guidance on duct repair, airflow, and insulation work that fits your home.